Summary
The goal of this project is to illustrate how to set up a Play application, hosted on GitHub, to use CloudBees for continuous integration. In addition, it illustrates how to incorporate quality assurance tools (Checkstyle, PMD, FindBugs, and Jacoco) into continuous integration. Finally, it also illustrates how to trigger deployment from your CI process.
Note that this procedure is tedious and complicated the first time you do it. Luckily, once you have successfully set up your first Play application on GitHub to use CloudBees for CI, you can use it as a template for setting up future projects, and the procedure is much, much faster and easier.
Continuous integration between CloudBees and GitHub requires several different uses of public and private keys. To help provide intuition on their use, I wrote a blog post on Introduction to public key authentication for git users. If you are not feeling confident with the use of public and private keys, you may find this posting to be useful.
I've divided this procedure into two parts: a "One Time Configuration" (OTC) part containing steps you have to perform only once on your GitHub and CloudBees accounts, and a "Per Project Configuration" (PPC) part that you have to do every time you want to put a new project under continuous integration. Here's an overview:
Overview of One Time Configuration (OTC)
- Set up your GitHub account and host your Play application
- Set up your CloudBees account and create a sample Play application
- Configure CloudBees Jenkins plugins
- Tell GitHub your CloudBees public key
Overview of Per Project Configuration (PPC)
- Prime the CloudBees pipeline
- Make CloudBees Jenkins job point to GitHub repo
- Configure build trigger
- Test your continuous integration and deployment
- Automate quality assurance tool invocation (optional)
Let's now look at each of these steps in detail.
One Time Configuration (OTC) Steps
The following steps need to be done only once; they constitute the "global" configuration process for both GitHub and CloudBees for use as CI for Play applications.
OTC Step 1: Set up your GitHub account and host your Play application
Begin by setting up an account on GitHub and hosting your Play application using it. Follow the excellent instructions if you haven't done this before.
You might want to fork the play-example-continuous-integration repo if you want to quickly set up a basic Play application with which to play with continuous integration. This repo also includes the quality assurance tool enhancements documented in play-example-quality-assurance.
OTC Step 2: Set up your CloudBees account and create a sample Play application
OTC Step 2.1: Create a ClickStart Play Application
Now set up an account on CloudBees. After you have created your account, use ClickStart to automagically create a sample Play application. While running the Play ClickStart, CloudBees will:
- Create a git repo to hold the source for the sample app.
- Create a database connected to the sample app.
- Set up a Jenkins build job for the sample app.
- Build the sample app using the Jenkins job.
- Deploy the sample app to the CloudBees hosting platform.
Getting all this done automatically is, clearly, pretty sweet, and you'll want to keep this sample app around for reference purposes. Doing the ClickStart also provides a sanity check that you can create, build, and deploy Play apps on CloudBees.
OTC Step 2.2: Install CloudBees SDK (optional)
Although it does not appear to be strictly necessary for CI, it can be helpful to install the CloudBees SDK, since it provides command-line access to your CloudBees projects.
Test your SDK installation by downloading the code for the sample Play app you created using ClickStart to your local workspace. To do this successfully, you will need to provide your public key to CloudBees so it can authenticate you when you pull the code using git. Here are some useful references:
- How to set your public key for git access in CloudBees
- Git Troubleshooting on CloudBees
- Help for "Permission denied (public key)"
Once you've downloaded your sample Play app, invoke "play test" to see that the system compiles and runs its tests successfully in your local environment.
Once you are comfortable manipulating this "vanilla" version of a Play application on CloudBees, it is now time to start customizing it for continuous integration with GitHub.
OTC Step 3: Configure CloudBees Jenkins plugins
OTC Step 3.1: Install GitHub plugin
In CloudBees, click on the "Builds" button in the nav bar to bring up your Jenkins instance, then click on "Manage Jenkins" in the left side menu bar. This brings you to the following page:
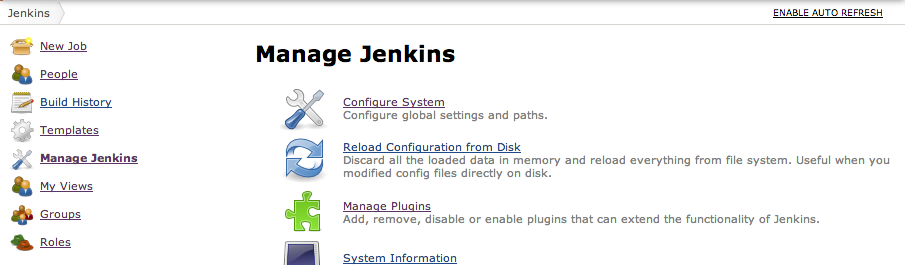
Click on "Manage plugins", click on "Available", find "GitHub Plugin", and then install and restart your Jenkins instance. After doing that, you should see the following near the bottom of the list of "Installed" plugins in Jenkins:

Now go back to the "Manage Jenkins" page, and instead of clicking on "Manage Plugins", click on "Configure System". You'll find a "Git plugin" section halfway down the page. Provide your user.name and user.email values as illustrated below:

Scroll down to the bottom of the page, and make sure that "Manually manage hook URLs" is selected:

OTC Step 3.2: Install QA plugins (optional)
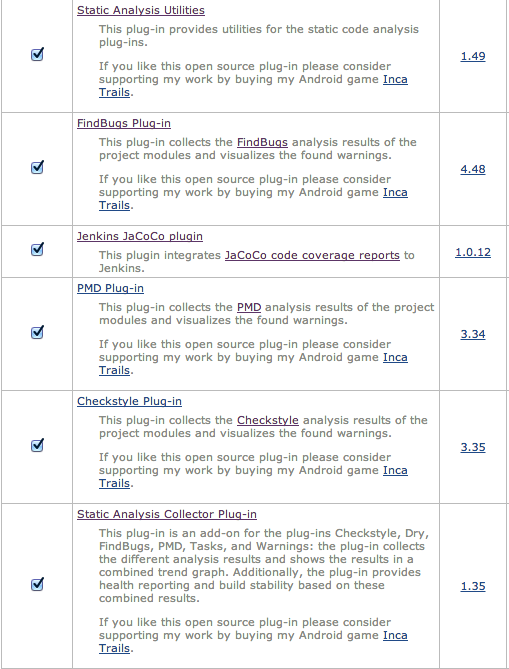
Part of the allure of continuous integration is the ability to run quality assurance tools such as Checkstyle, PMD, FindBugs, and Jacoco in the cloud and to see trends in the issues reported by those tools over time. To provide good reporting on these tools, you will want to install their associated plugins as well. This is an optional step.
Following the same process as before, go to the "Manage Jenkins" page, click on "Manage Plugins", and install the "Static Analysis Utilities", "Static Analysis Collector Plug-in", "FindBugs Plug-In", "Jenkins JaCoCo Plugin", "PMD Plugin", and "Checkstyle Plugin". Restart Jenkins. When all of these have been installed, the "Available" tab in the Manage Plugins page should contain the following:
OTC Step 3.3: Install and configure build status badge (optional)
It's nice to be able to display the status of the build in your GitHub page. Here's an example from the bottom of the play-example-quality-assurance project's README page:
![]()
If you want this (and of course you do), you must first install the "embeddable-build-status" plugin to Jenkins. Go to "Manage Jenkins", then "Manage Plugins", then install embeddable-build-status. Restart Jenkins. Once Jenkins has restarted, you should see the following near the bottom of the "Available" tab in the Manage Plugins page:

Now you must configure Jenkins to support anonymous access by following the instructions here. In brief, you must:
- Provide the Jenkins anonymous role with "Job/Read" access.
- Flip the switch for anonymous access by going to "Manage Jenkins", then "Configure System", then clicking "Enable read-only access for anonymous users", and finally clicking "Save".
Now you can display the build badge in your GitHub README file with the following code:
[](https://philipmjohnson.ci.cloudbees.com/job/play-example-quality-assurance/)
Of course, replace "philipmjohnson" and "play-example-quality-assurance" by your own account and job name.
But, we're getting a little ahead of ourselves, since that's done on a per-repo basis. There's just one more "one time configuration" task to do.
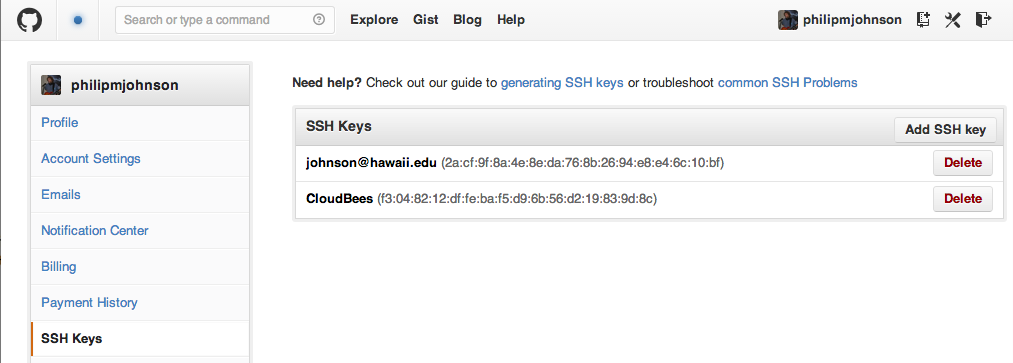
OTC Step 4: Tell GitHub your CloudBees public key
In order for the CloudBees Jenkins server to obtain your GitHub project via git, GitHub needs to be given your CloudBees public key. Follow the instructions here. Though these instructions say they are necessary for private GitHub repositories, actually you need to do this even if your repository is public. In brief:
- In CloudBees, go to Jenkins, then click on "Manage Jenkins", then click on "Configure System". In the "CloudBees DEV@Cloud Authorization" section, there is a field named "CloudBees Public Key". Copy the contents of that field.
- In GitHub, go to Account Settings, click on "SSH Keys", then click "Add SSH Key", then paste your CloudBees public key and name it something like "CloudBees".
When you're done, your GitHub SSH Key page should look something like this:
Per Project Configuration
Now that you've finished the global configuration of CloudBees and GitHub, we can now set up continuous integration process for a specific Play application. Let's call this "per project configuration" (PPC).
PPC Step 1: Prime the CloudBees pipeline
PPC Step 1.1: Create the default project
Assume you have a GitHub-hosted Play application called "play-example-continuous-integration" for which you want to set up continuous integration on CloudBees. The first step is to use the Play ClickStart feature on CloudBees to, in a sense, "prime the pump" by creating a sample project also called play-example-continuous-integration. When finished, CloudBees will indicate that it has set up a git repository, jenkins job, mysql database, and running application:
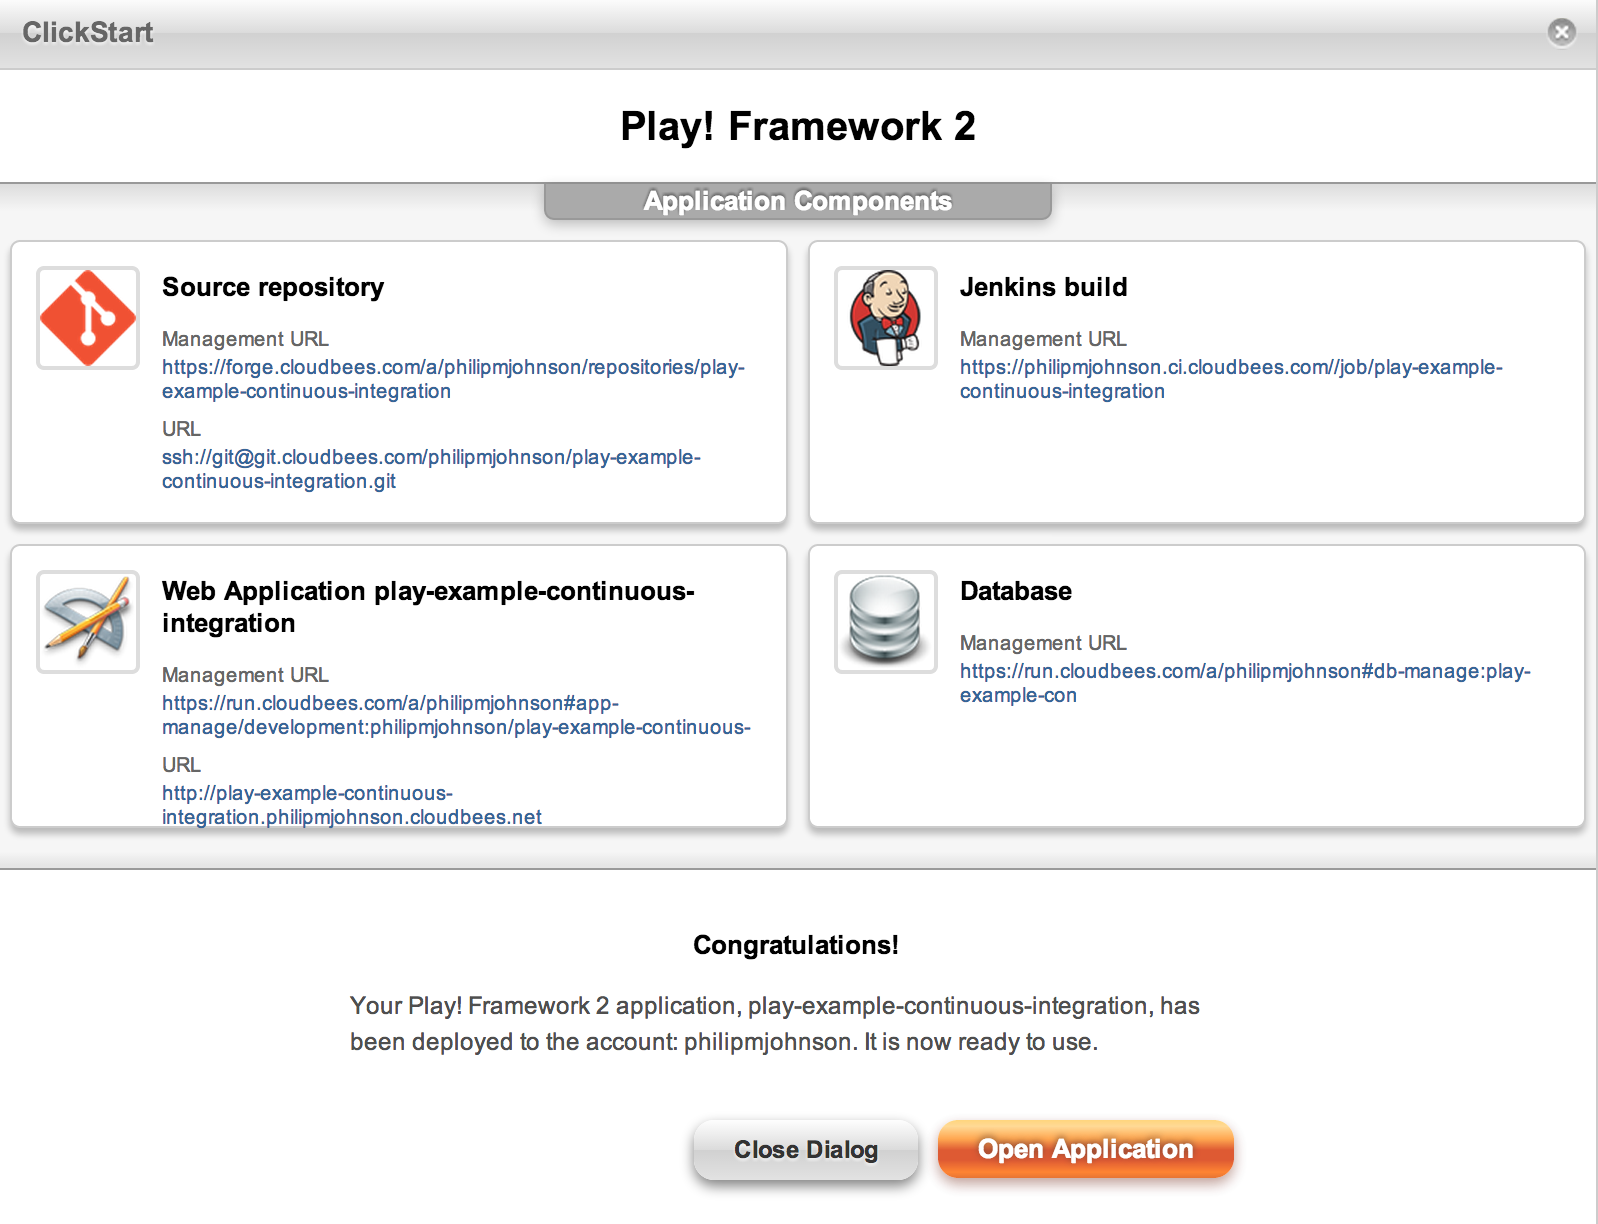
PPC Step 1.2: Delete the git repo on CloudBees
Since we are using GitHub as our repository, we will not need the one created by ClickStart on CloudBees, so it will reduce confusion to delete it. After dismissing this dialog box, click on "Repositories" in the CloudBees nav bar, then select "play-example-continuous-integration", then click "Delete repository".
PPC Step 2: Make CloudBees Jenkins job point to GitHub repo
Click on "Builds" in the CloudBees nav bar, then select the play-example-continuous-integration job to get the following window:
If you are not seeing all the menu items on the left hand side, it is likely because CloudBees is displaying you as a "guest" user. If so, click on "Login" on the upper right side to restore full access to the job.
PPC Step 2.1: Wipe out workspace
I have had problems in the past that were resolved by deleting the default workspace, so I recommend that you click on Workspace, then "Wipe out workspace" to get rid of the default project source files. The following image shows the project just before clicking the "Wipe out workspace" button:
PPC Step 2.2: Point Jenkins job at GitHub repo
Now we'll tell the Jenkins job where the real source code lives. Go to your GitHub project and find the "SSH Clone URL" text field on the right side of the page, as shown below:
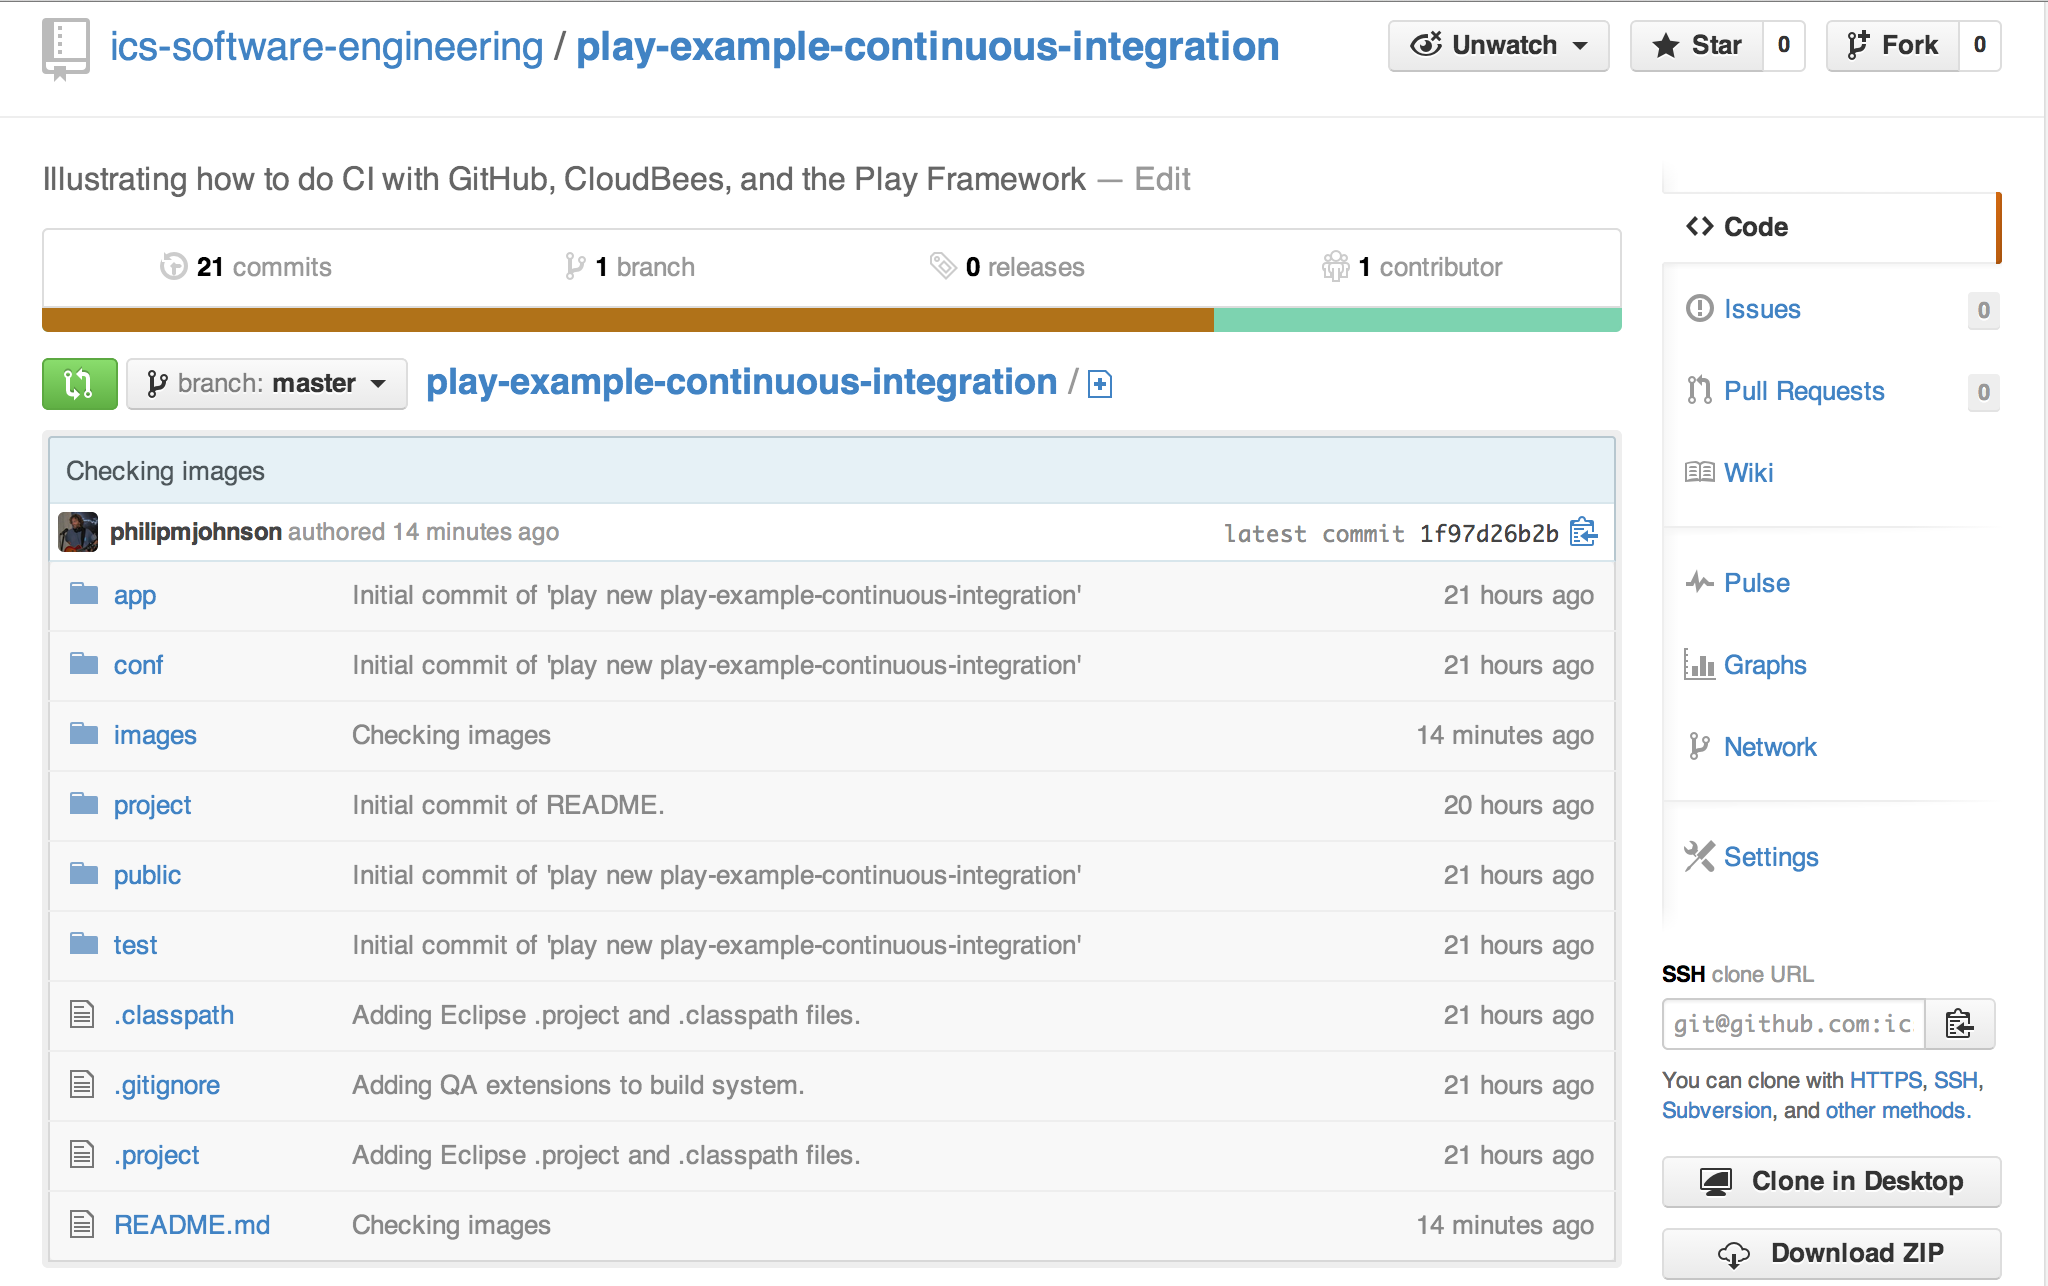
Click the clipboard button to copy the URL. Now go to your CloudBees Jenkins job for play-example-continuous-integration, click on "Configure", and scroll down to the source code management section. You should see something like the following:
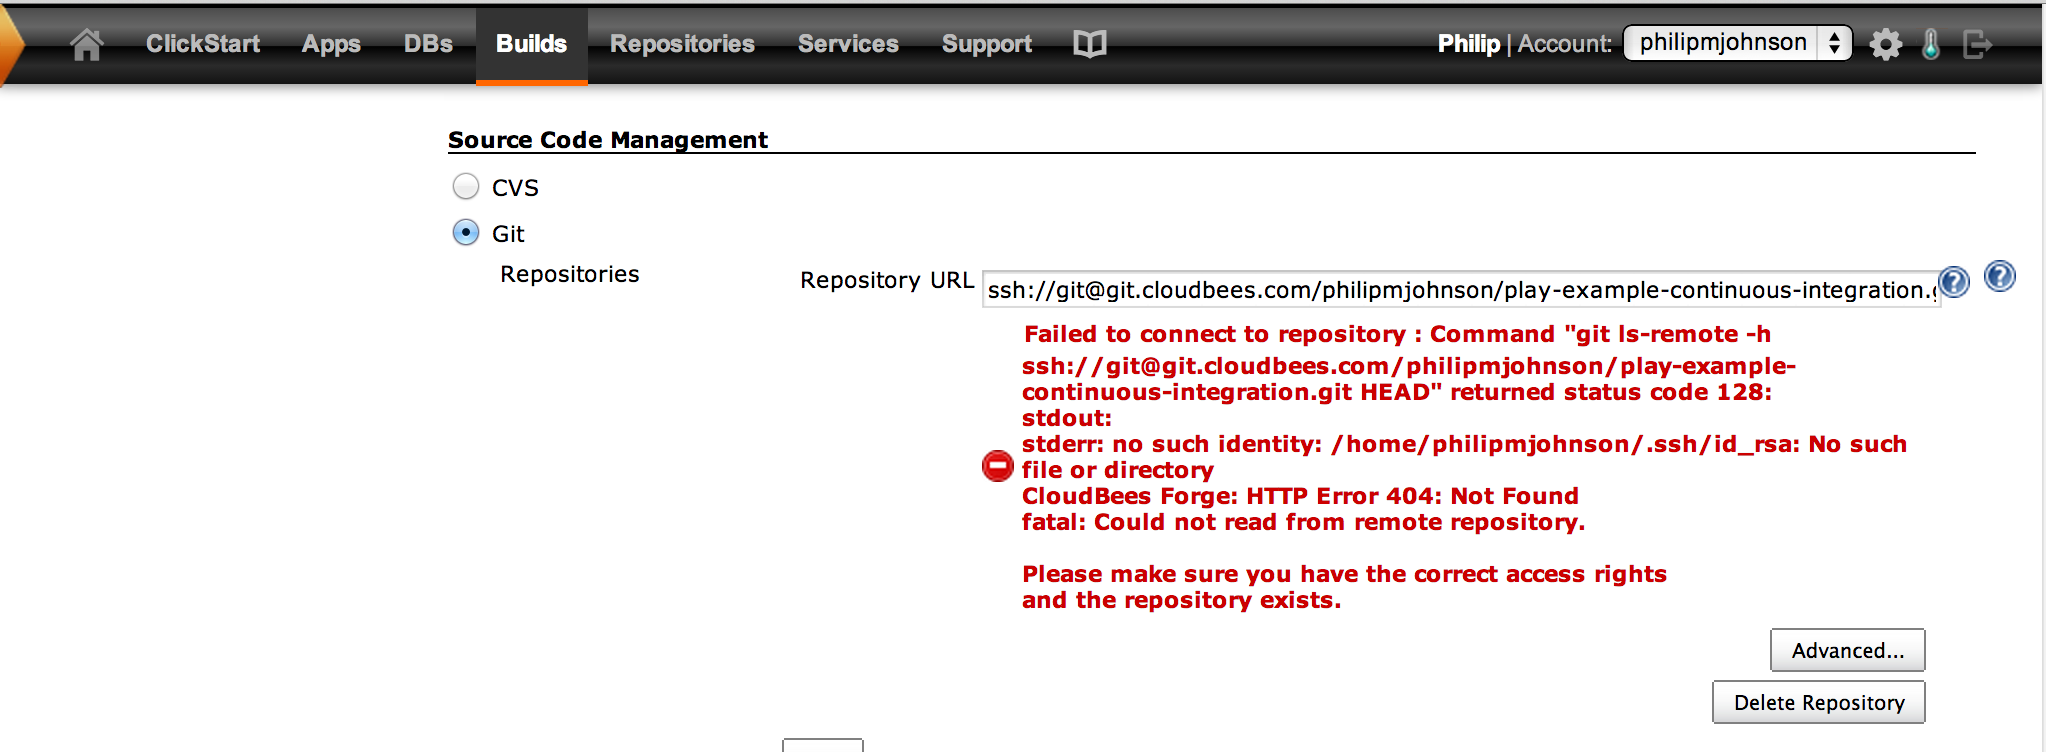
Jenkins is displaying this error because we previously deleted the default repo on CloudBees.
Now paste in the SSH Clone URL that we copied from the GitHub repo, and tab out of the field. Jenkins should now display the following:
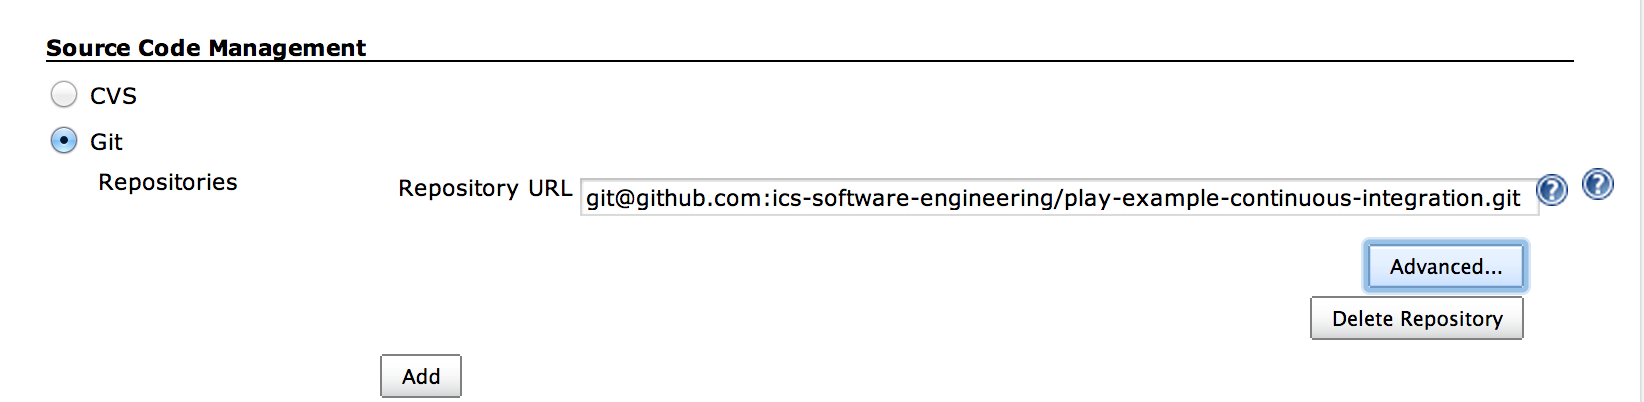
Click "Save" to save the new repo setting to your Jenkins job configuration.
If Jenkins displays an error, you'll need to fix it. A common problem is forgetting to give GitHub your CloudBees public key; see "OTC Step 4" for details.
PPC Step 3: Configure build trigger
To automate continuous integration, we want CloudBees to kick off a build each time a change is pushed to the GitHub repo. This requires configuration to both CloudBees and Github.
PPC Step 3.1: Set Jenkins job to build after a change to GitHub
Select "Configure" in your job's home page, then scroll down to the "Build Triggers" section. Unselect "Build when a change is pushed to CloudBees forge", and select "Build when a change is pushed to GitHub". The section should now look like this:
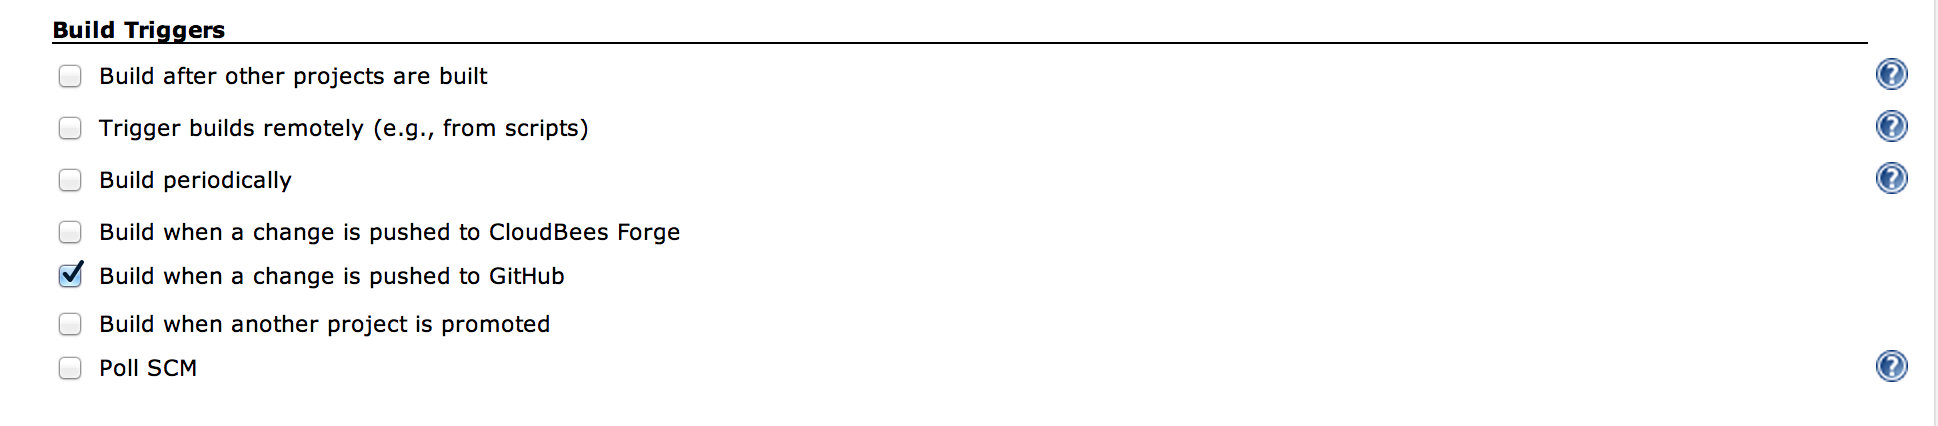
Click "Save" to save the new build triggers setting.
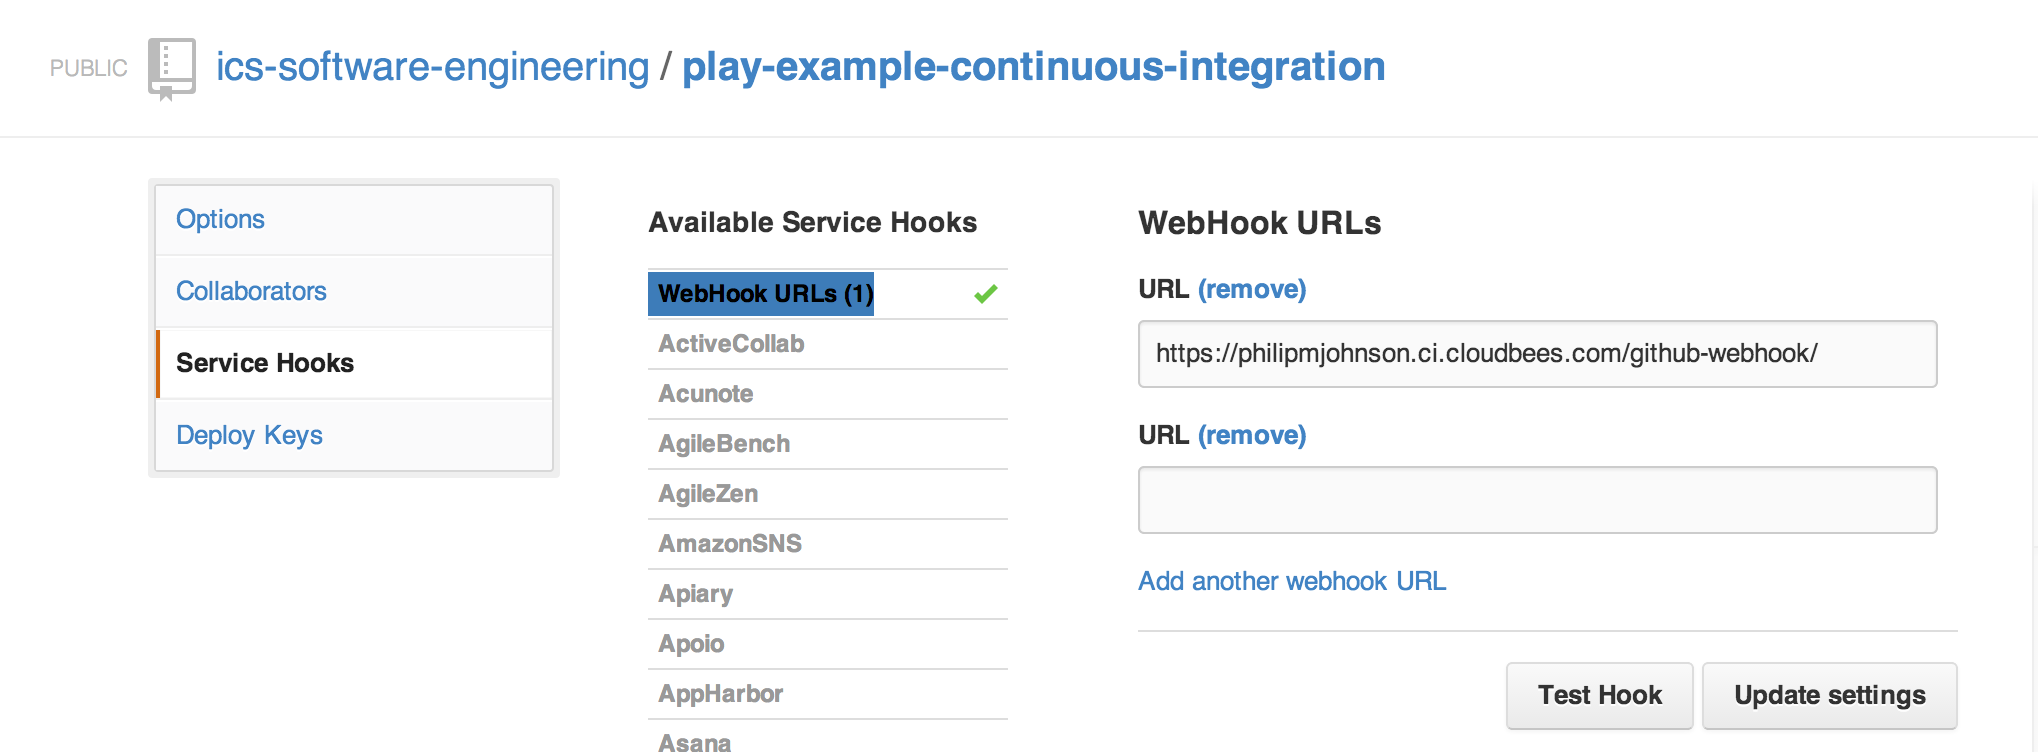
PPC Step 3B: Add a webhook to your GitHub repo
Now go to your GitHub repository, and click on "Settings", then "Service Hooks", then "Webhook URLs". Add this webhook URL:
https://philipmjohnson.ci.cloudbees.com/github-webhook/
Replace "philipmjohnson" with your own CloudBees account name. Click "Update Settings". When done, it should look like this:
PPC Step 4: Test your continuous integration and deployment
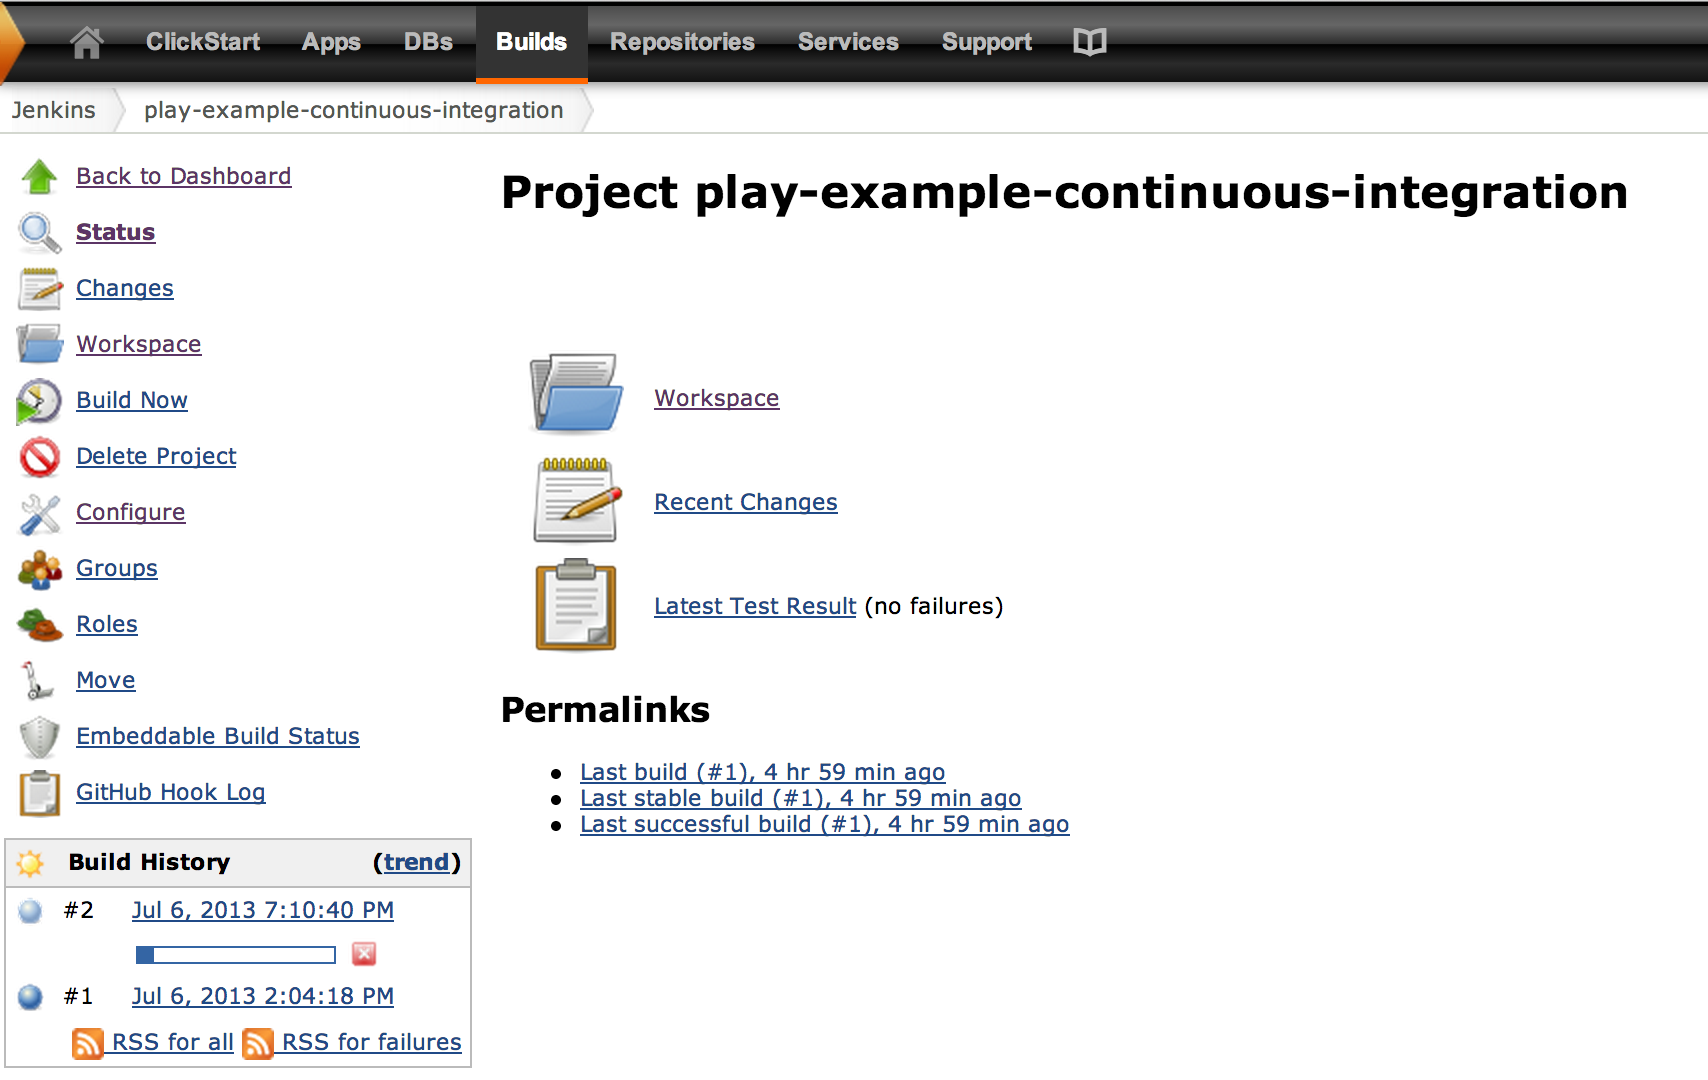
You can now test your new CI and deployment setup. Simply click on "Test Hook" on the Webhook URL page of your GitHub repo. You will not get any output from pressing this button, but it should trigger a new build in CloudBees.
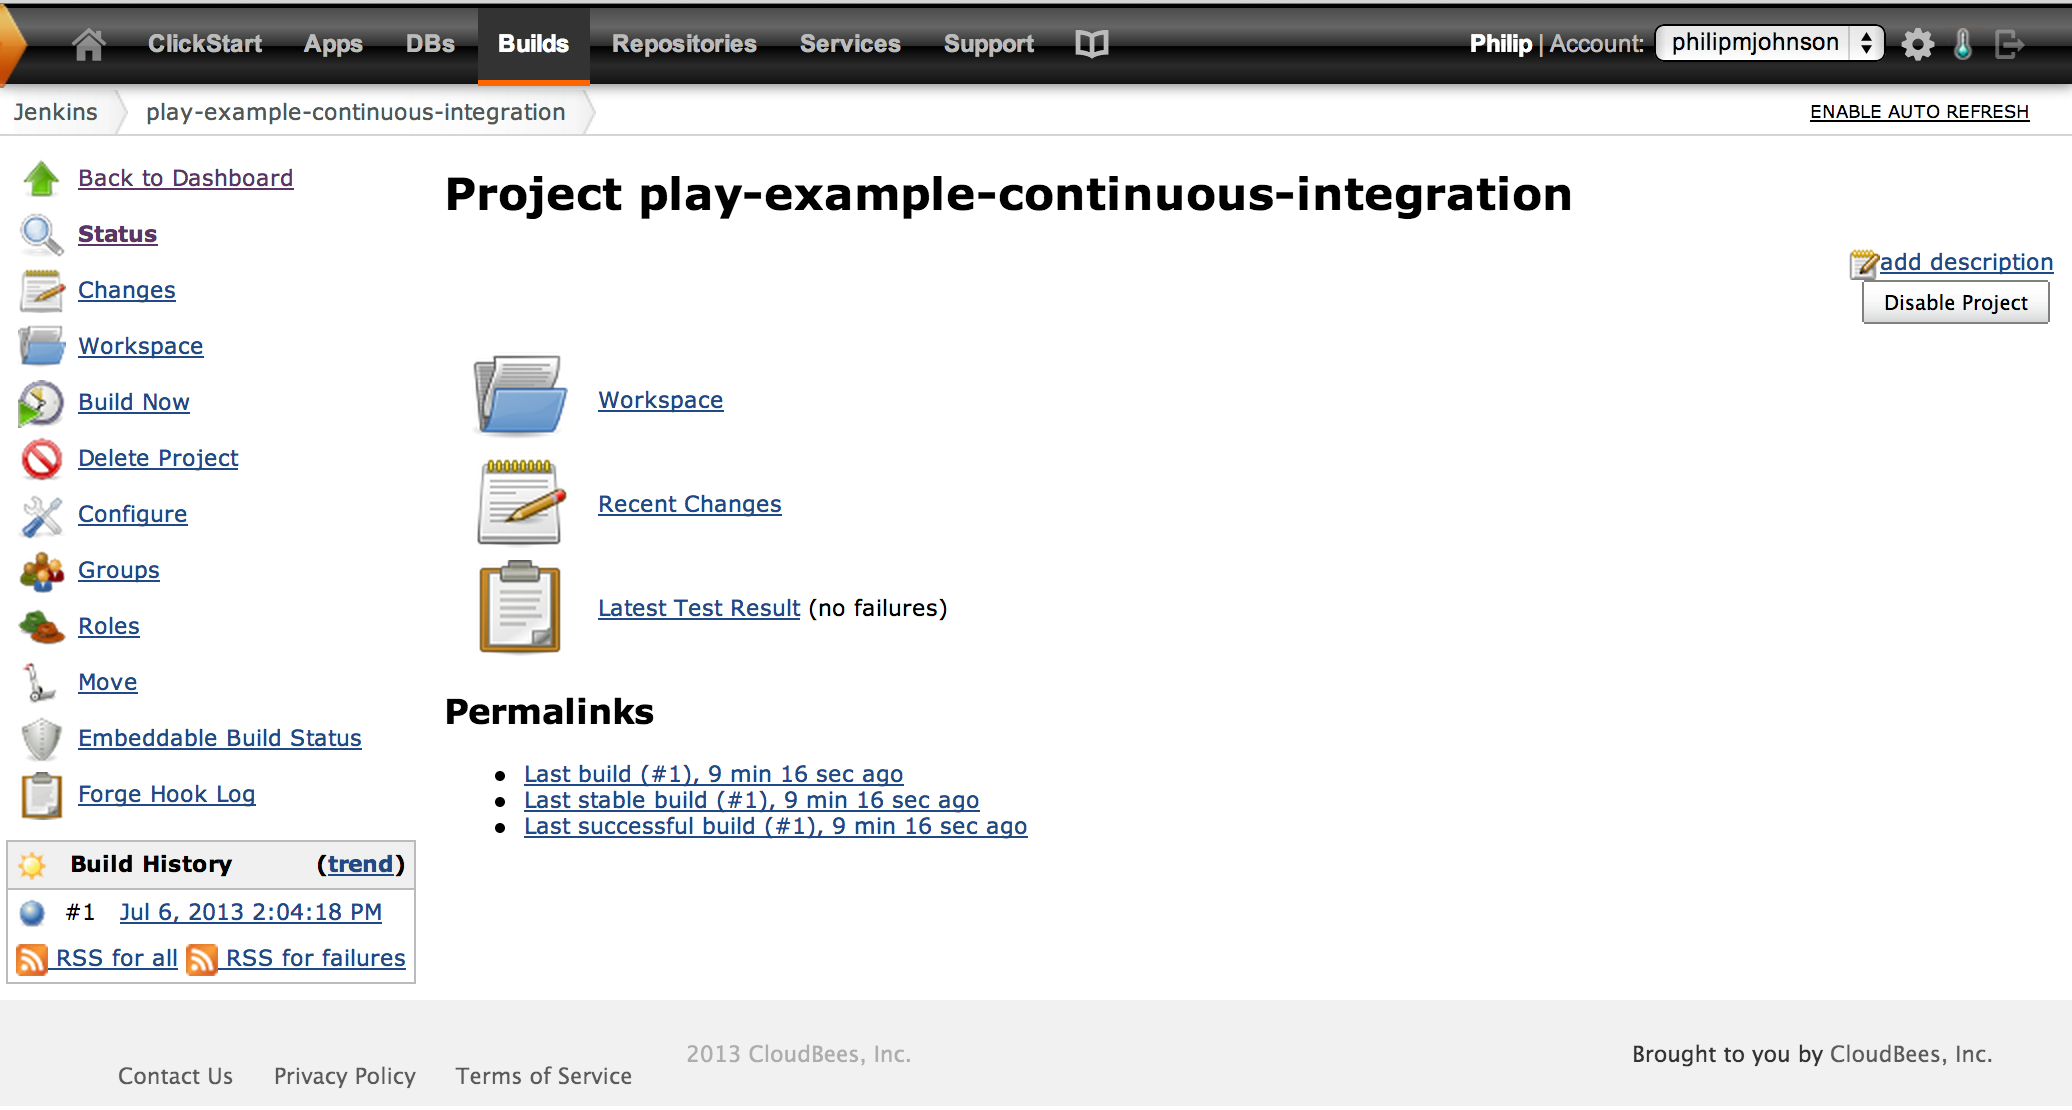
To see if the build was triggered, go back to your CloudBees Jenkins job main page. Within 10 seconds or so, you should start to see activity in the Build History window. See below for the start of the new build:
Once you see build activity, go to the Console window to watch the progress of the first build:
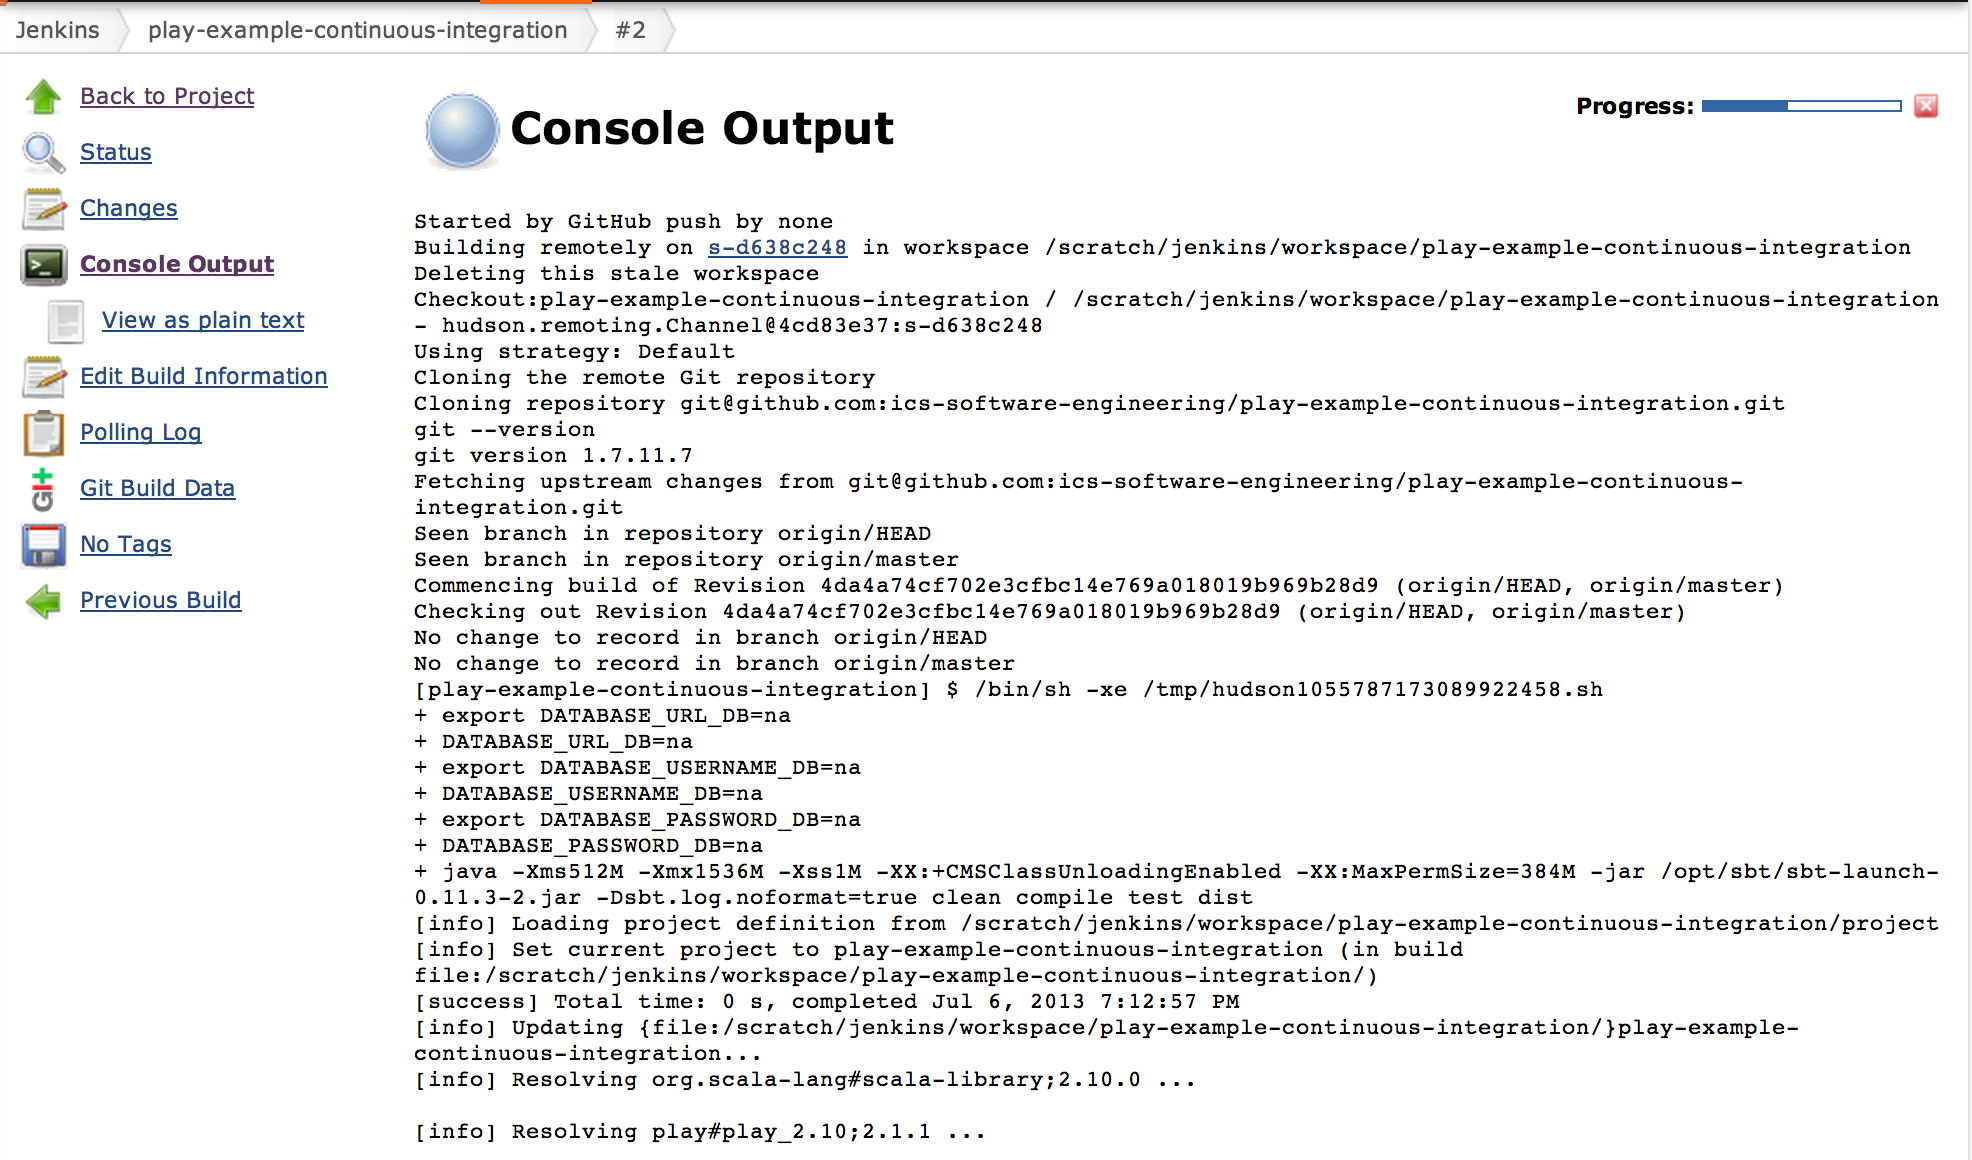
If all goes according to plan, after 5 to 10 minutes the console window should conclude with a successful build and deployment:
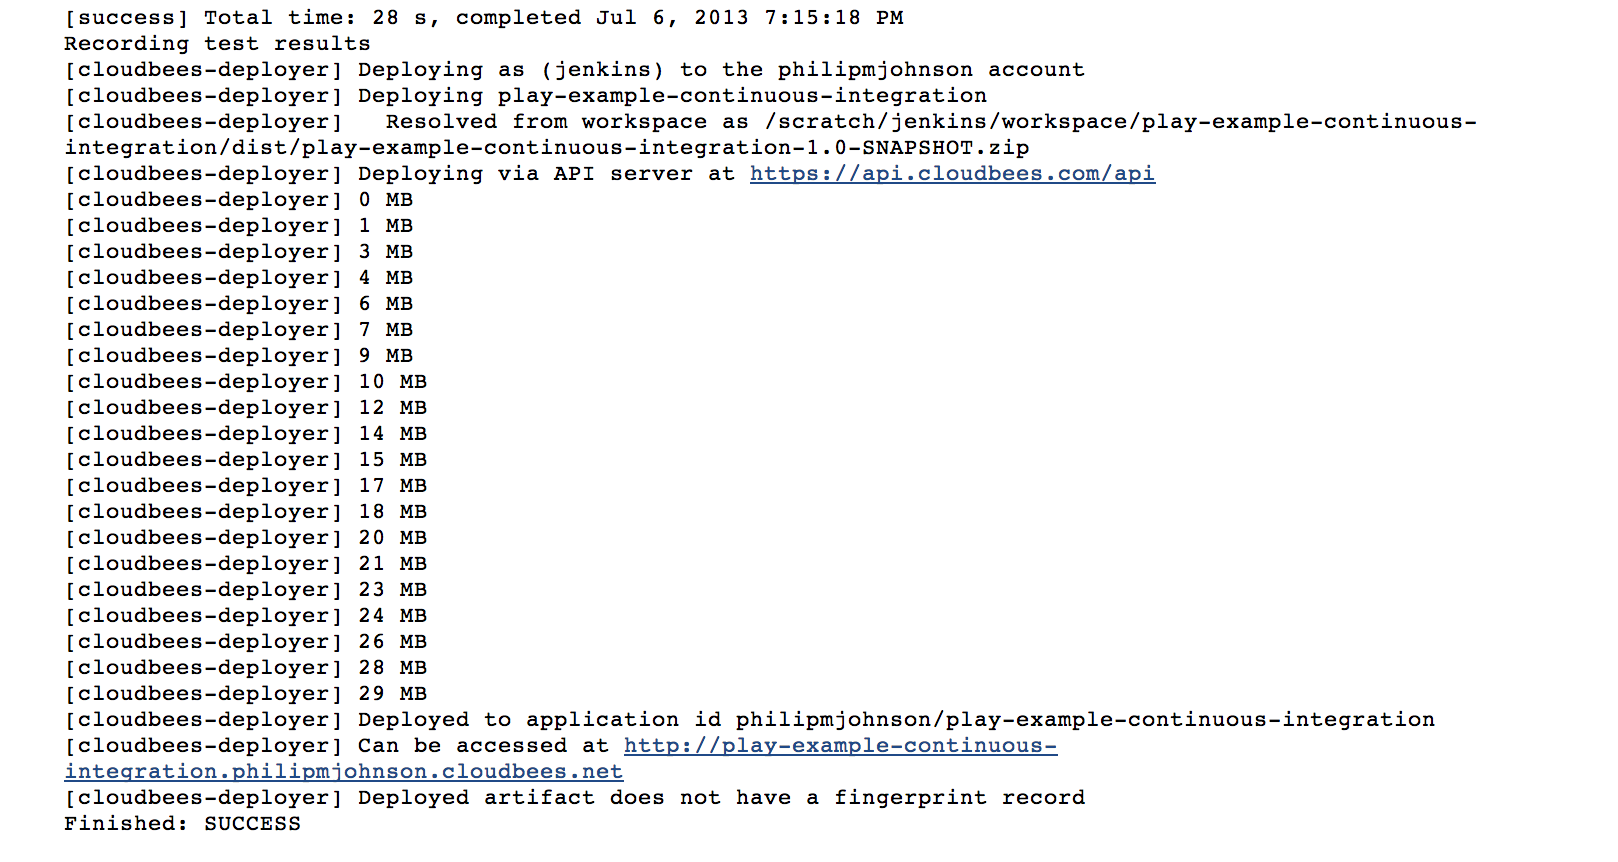
Congratulations! You've just set up continuous integration. As an added bonus, your application has been automatically deployed to the CloudBees runtime environment and you can play with it there.
PPC Step 5: Automate quality assurance tool invocation (optional)
Overall, there are three steps to implementing QA into your continuous integration process:
Add QA tool invocation to your Play build process, so, for example, you can run "play checkstyle" to run the Checkstyle QA tool. For instructions on how do this, see the play-example-quality-assurance project.
Add the QA tool reporting plugins to your Jenkins instance, as explained in OTC Step 3.2 above.
Modify your Jenkins configuration to (a) invoke QA tools in the build command, and (b) invoke QA reporting tools after the build.
This section explains how to do (3).
PPC Step 5.1: Invoke QA tools in the build command
To invoke your quality assurance tools as part of the build, include them in the build command. Here is an example of adding checkstyle, pmd, findbugs, and jacoco:cover to the build command, located in the "Build" section of your Jenkins job configuration page:
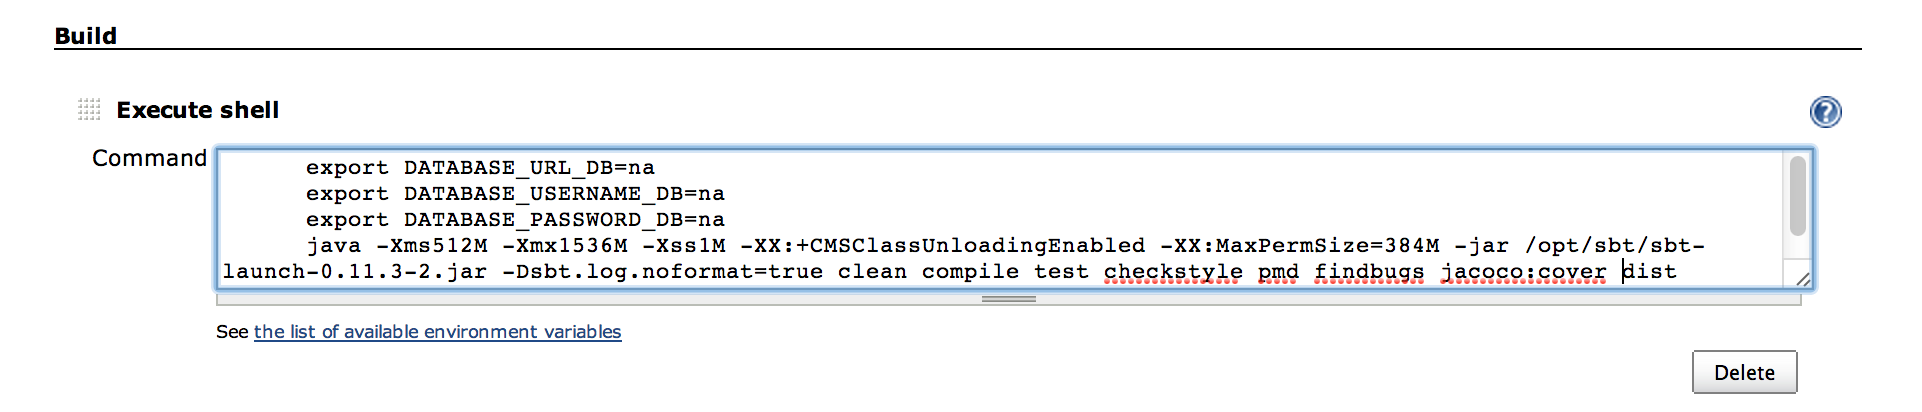
Click "Save" to save this change to your configuration. Then, click "Build Now" to test that your commands run correctly within Jenkins.
PPC Step 5.2: Invoke QA reporting tools after the build
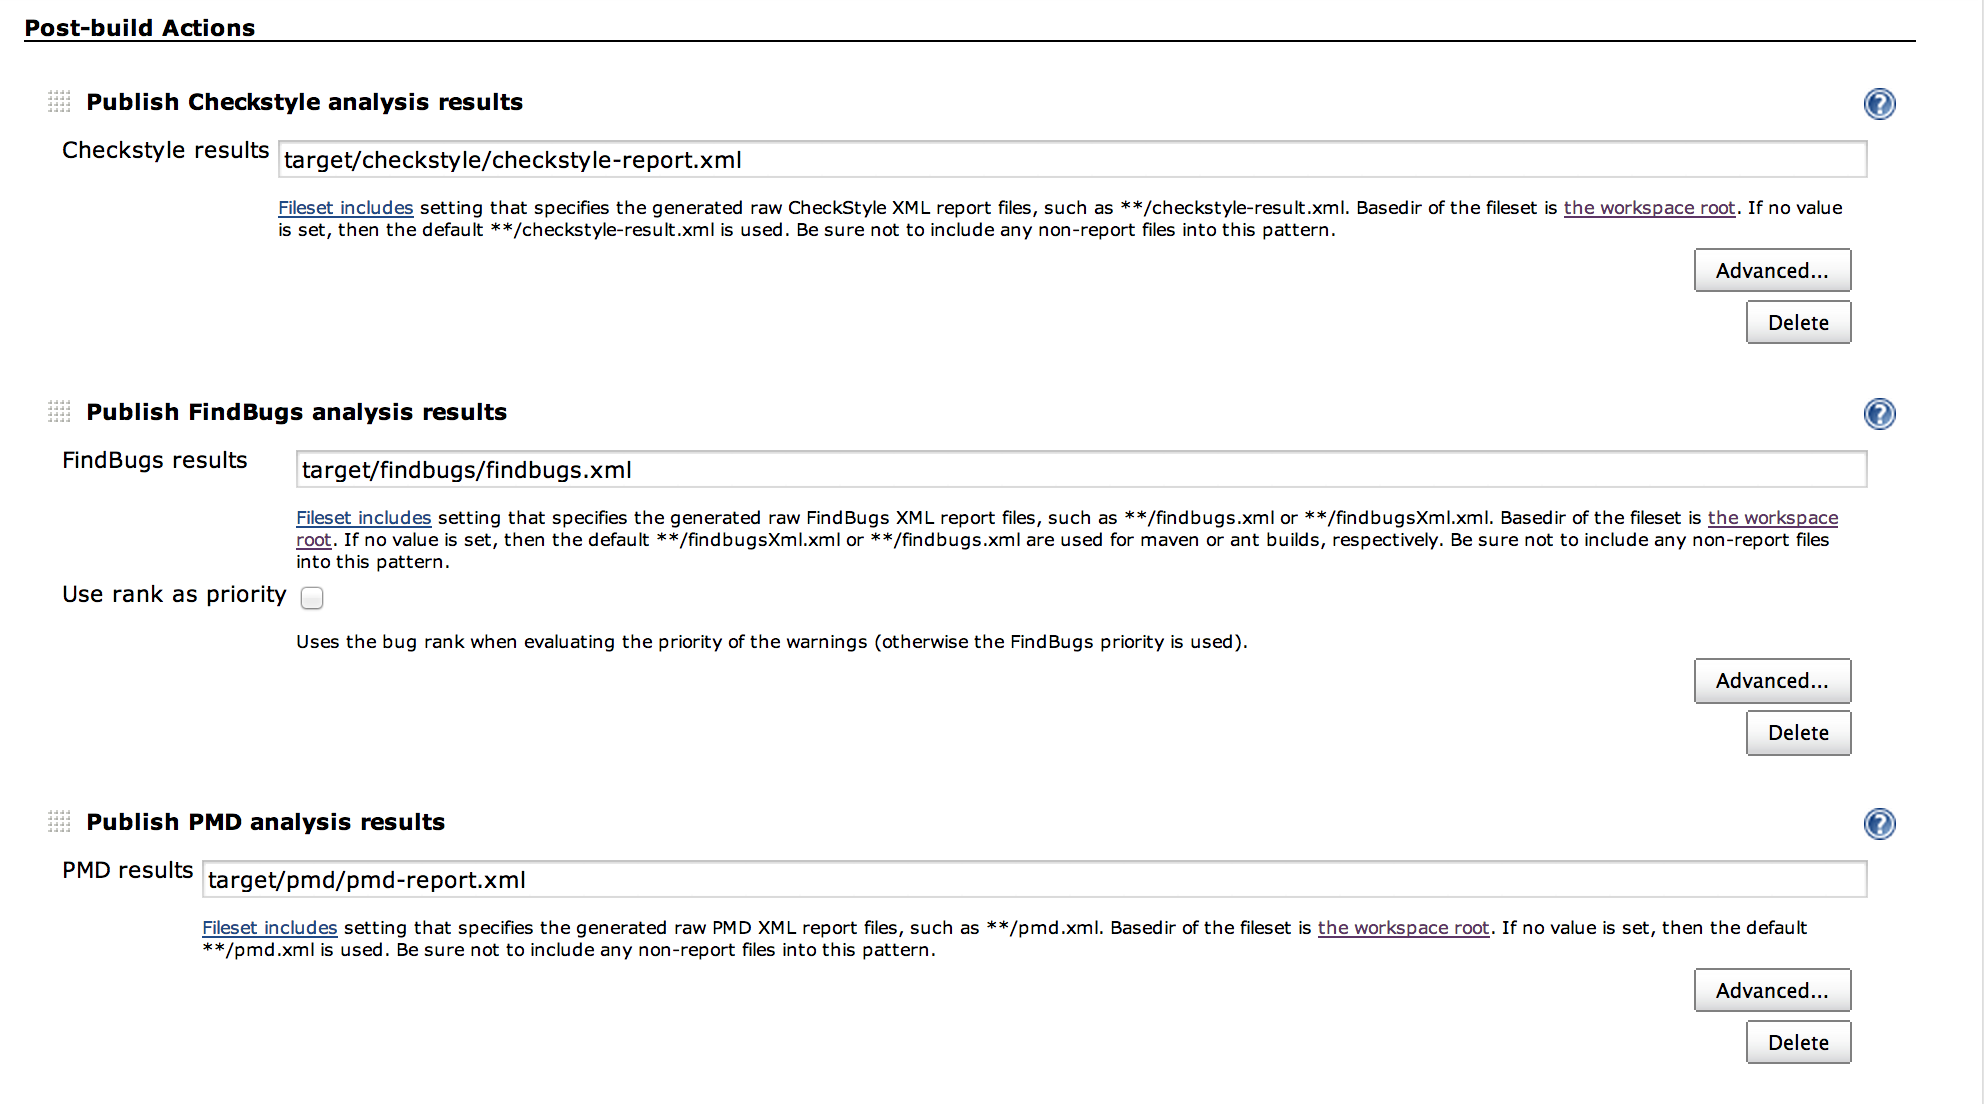
To obtain reports of your QA tool results within Jenkins, you can add "Post-build Actions". In the Post-build Actions section of your Jenkins job configuration page, click on "Add post-build action". If you have installed the QA plugins correctly, a menu similar to the following should appear:

Select the QA tools for which you wish to generate reports. Here is an example set of post-build actions for Checkstyle, PMD, and FindBugs reporting. Note that you may need to set the path to the report generated by the tool invocation. If you're not sure where the report is located, you can use the "Workspace" link to search through the target directory. Note that you may need to configure the QA tool to generate its report in XML format.
Here is an example configuration for Jacoco test coverage reporting:
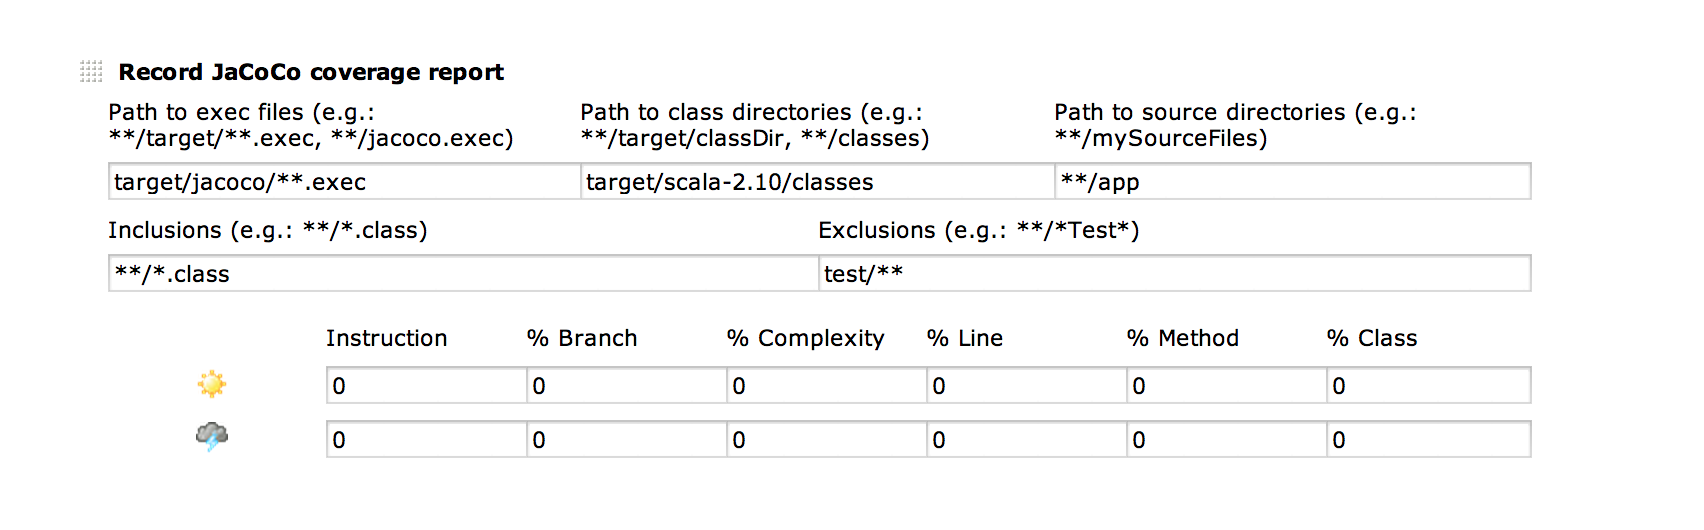
Click on the "Advanced" button to configure aspects of the report. For example, you can configure the build to fail if a threshold number of warnings are exceeded, or configure the way the graphs are presented on the page.
Simplifying the setup once you've done it once
Here's the silver lining for this whole complicated process: After you've successfully got one of your projects configured for continuous integration, getting the second one is vastly more simple. In brief:
- Use ClickStart to create the new project on CloudBees
- Delete the CloudBees repository and Jenkins job.
- Create a new Jenkins job, using the "Copy existing job" option and selecting a job already setup for CI.
- Edit the repository URL and application name.
- Add the webhook to your GitHub repo.
- Click "Test hook" in GitHub to kick off the new build.
Here's a screencast that goes over these steps in detail:
Build Status
For illustration purposes, here's the build status of this project:
Acknowledgements
Many thanks to Felix Belzunce of CloudBees who patiently and promptly answered my many questions as I developed this tutorial.